Experiment #1
Environment: - A warm, sunny day in March.
Equipment:
- An important document.
- A bottle of Pilot 'Royal Blue' Ink
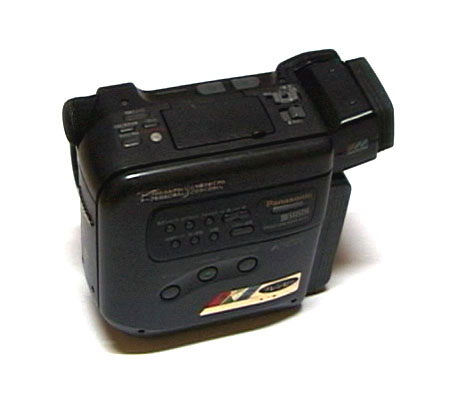
- A Sony camcorder ' TR250PK'.
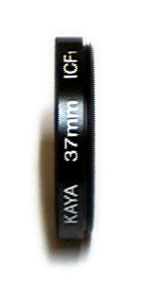
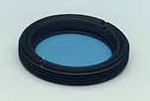
- A KAYA 37mm PF4. |
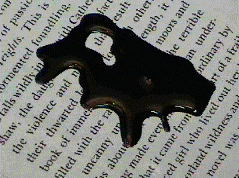 |
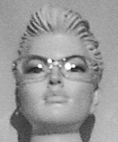
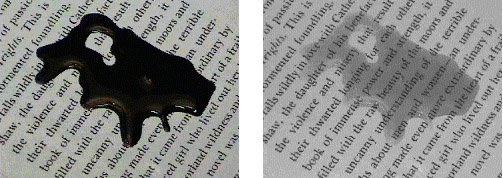
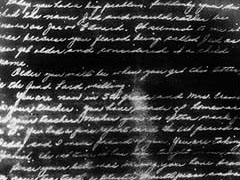
We 'accidentally' spilt some permanent ink on this document. As you can see, the text is now impossible to read. |
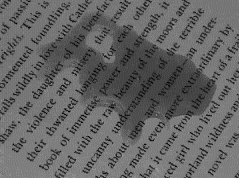 |
However, when the PF is attached to our camera, the writing is clearly legible through the ink.
Note: If the writing doesn't appear clearly here, try adjusting your monitor's brightness and contrast. |
Reflected "See-Through"
Perhaps you are wondering what makes this ability possible. The answer lies in infrared rays. All reflected light that we can see with the naked eye represents a fractional portion of the electromagnetic spectrum, which is infinite. We refer to this section as "visible light". All around us, light is reflected which the human retina cannot detect, such as ultraviolet and infra-red radiation.
The visible part of the spectrum falls between the wavelengths of 430nm~690nm. (1nm=10-9m) Infrared rays have much larger wavelengths than this. We divide them into "Near Infrared Rays" (690nm-4,000nm) and "Extreme Infrared Rays" (over 4,000nm).
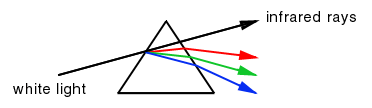
Unlike ultraviolet and visible rays, infrared rays tend to penetrate any medium rather easily because of their large wavelengths. This also means that infrared rays are not refracted much at all when passing from one medium to another. When we shine sunlight through a prism, it is refracted at an angle according to its wavelength. The blue end of the visible spectrum has the shortest wavelength, so is refracted the most. At the other end of the spectrum, beyond the red, visible light, infrared rays are barely refracted at all because of their long wavelength.
The KAYA PF exploits this characteristic of infrared light. It only lets through these long-wavelength rays, which have low refractive rays, and not all the ultraviolet and visible rays. Here's how this relates to the mannequin experiment:
- Light source
- Mannequin
- Clothes
- Infrared rays
- Ultraviolet and visible rays
- KAYA PF
- Camcorder
|
 |
Almost all of the ultraviolet and visible rays are unable to permeate the fiber and are reflected back instead. Conversely, almost all of the infrared rays can easily permeate the material due to its low refractive rate. Having passed through the cloth, the infrared rays fail to penetrate the mannequin's surface and are reflected back.
The PF is struck by ultraviolet & visible rays that are reflected from the cloth and also the infrared rays that are reflected from the mannequin's surface. But the PF only lets the infrared rays pass through. The infrared rays are then transformed into electrical signals by the CCD of a camcorder, which forms those signals into a visible-light image.
In conclusion, the observer will be able to view the scene as though infrared light has become visible.
Of course, if you were to simply look through the PF, you would not see anything at all. Remember, the PF lets through infrared light only, which is invisible to the human eye. Therefore there must be some media, or device, installed to detect and record, or convert, the image. As mentioned previously, camcorders and digital cameras are suitable devices for this purpose because they employ a CCD which responds to both visible and infrared light.
Strictly speaking, it would be more accurate to regard these "See-Through" pictures as "near-infrared images" rather than "infrared images" since almost all CCDs can only respond up to 1400nm. Thus from hereon we shall use the term "near-infrared", or "NIR" when talking about the images the PF allows.
Fluoresced "See-Through"
The principle of "Fluoresced See-Through" is very different to the "Reflected See-Through" principle above.
When some substances are illuminated by certain wavelengths they reflect back not only those same wavelengths but also they may transform some of these into other, usually longer, wavelengths. For example, some substances may transform the illuminating visible light energy into longer-wavelength infrared energy.
What causes this phenomenon? The answer can be found in atomic physics and quantum mechanics. Within atoms, electrons orbit about a central nucleus. If a packet of light energy (a "photon") is absorbed by the atom, it causes one of the electrons to move out to a wider orbit. As described by quantum mechanics, atoms will only ever absorb radiation which has the right amount of energy to make one of the electrons perform this "quantum leap" to the next electron "shell". A photon's energy is dependent on its wavelength (and therefore, its colour), with violet being higher energy than red. However, an atom with an electron out of place is not stable for long so the electron falls back, re-releasing a 'photon' of energy. Some energy is lost so the photon given off is shifted towards the red end of the spectrum compared with the one absorbed.
A Fluoresced See-Through image is slightly more difficult to achieve. Besides the PF filter, an Infrared Cut Filter ("ICF") is required to create one. This filter performs the exact opposite task to the PF - it lets through visible light but cuts all infrared light from passing through. To capture a Fluoresced See-Through image, the ICF is placed over the light source to limit the incident light and prevent any infrared rays emitted by the source from reaching the subject. Some of the visible rays, which remain, striking the subject are changed to longer, invisible infrared rays and then the PF filter allows only these newly created infrared rays to pass into the camcorder or digital camera.
This Fluoresced See-Through technique often reveals characteristics of a subject that are not readily apparent through other examination methods including Reflected See-Through. For example, chlorophyll in plants does not reflect infrared rays, but it does fluoresce. This may provide a means for studying certain plant diseases. Similarly, this technique can be used for the study of inks, hardwoods, forged documents or paintings and sometimes startling results can be obtained.
To take more effective Fluoresced See-Through pictures, note the suggestions below:
| Environment |
If possible, total darkness. |
| Light source |
Tungsten or Electronic Flash. |
| ICF |
KAYA's ICF1 over the light source.
This is not required if there is another way to ensure the subject is only illuminated by visible light. For example, wavelength-tunable lasers or blue-green lasers are ideal. Wavelength-tunable lasers have the advantage of being able to easily select from a wide range of wavelengths. |
| PF |
PF2 or PF4. |
Police Force
The PF can help you to see perfectly through sunglasses and dark, tinted car windows. Let's imagine there's a man walking the street. He fits the descript-xion of a known murder suspect, but he is wearing a pair of dark sunglasses, so no-one can see his eyes. Yet there is a way to check he identity without even having to approach the man - a video camera equipped with a KAYA PF would see straight through the dark sunglasses. To the viewer, they now appear totally transparent, like standard glasses. The man's face would be identifiable even if he was in a car with tinted windows!
Long-distance Photography
The PF can be used for improving visibility through certain kinds of fog or haze. This property is particularly important for long-distance photography on the ground where the detail of distant objects is often obscured by haze. It is also useful for high altitude, and especially oblique photography from the air like when landing an airplane in a foggy airport. Actually, the PF does not always result in a very striking increase in the range of vision, but it generally increases the contrast of the distant objects and thus the amount of detail that can be seen.
Pollution Monitoring
The PF can be used in pollution monitoring applications. Since both water and air when pure have very low NIR (Near Infrared Rays) reflectance those appear very dark when viewed through the PF. But their reflectance may be greatly increased by the presence of minute quantities of dissolved or suspended materials and this makes them appear less dark under the same conditions. Though a PF will not detect thermal pollution such as warm water entering a river from a generating station or hot gases above a smokestack, it may detect chemicals, certain dusts, pollens, aerosols and gases dissolved in gaseous or aqueous effluents owing to pure water and air's low NIR reflectance.
Ice Reconnaissance
The PF can be used to obtain data on sea-ice distribution and movement. Because of its low reflectance to infrared radiation, water appears very dark and the ice appears light in an image. Therefore, the interface between water and ice and land becomes highly discernible.
Agriculture, Plant Pathology and Forest Survey
The PF can be used in agriculture, plant pathology and forest surveys for the detection of crop yields, crop and tree diseases, insect infestations in forests and orchards, and identification of tree species. NIR images of foliage made with the PF often show great variations in NIR reflectance even when leaves visually show just small variations in shades of green. When viewed through the PF, healthy grasses and the foliage of healthy deciduous trees appear white because of the high NIR transmission characteristic of green chlorophyll and the high NIR reflectance of the underlying cellular structure of these subjects. On the contrary, diseased and dead trees and burned grass tend to appear dark in an NIR images. Also in any given vegetation, the season, the water and mineral content of the soil, and the age and health of the vegetation may cause its NIR reflectance to vary. In fact, the first sign of a distressed tree (or plant) is often a decrease in NIR reflectance, which frequently first becomes apparent in NIR images. This means that the first sign can be detected by using the PF before trouble becomes apparent visually.
Documents and Paintings Inspection
Inks, dyes, pigments, and other materials which may appear indistinguishable to the eye often appear differently in NIR images. Printed matter, engravings and photographs that have become undecipherable through dirt or age or other damage can frequently be revealed when viewed through the PF. Mechanical or chemical erasure can often be determined, even if overwritten, provided the overwriting is in an ink transparent to NIR. Even writing on documents charred in fires can also be readable provided the charring has not gone too far. Differences in inks and dyes used in forged documents, certificates or identification can also be distinguished when viewed through the PF. The PF often penetrates the surface of ancient inks and dyes of paintings, art or artifacts and reveal what lies beneath. Thus, paintings or other similar works of art can be examined to determine the authenticity of those or to see if there has been over-painting or other alterations.
Particularly, fluoresced see-through techniques often show off its surprising ability to make visible a subject that gives our eyes very little or no clue as to its existence. Here is one example: The subject was a letter that had been placed in a home-made time capsule and buried near the cornerstone of a private home. 20 years later it was unearthed and, to the dismay of the family, all the words written by the mother of the family with pen and ink were washed away by water that had seeped into the box. The residual ink remaining in the paper was quite invisible to the naked eye but our fluoresced see-through technique reveals the messages dramatically.
Thus, the PF can be a simple yet powerful tool for the study of faded, burned, worn, dirty or altered documents or paintings, secret writing and so forth.
Camouflage Detection
The PF can be effective for detecting camouflage when photographing objects painted to simulate foliage. Camouflage detection may be possible by directly comparing a normal picture with a NIR picture of the same objects. For example, most normal green paints, which match green foliage visually, are strong absorbers of NIR and appear dark in a NIR picture, while natural healthy green foliage appears white. So camouflaged areas are most easily detected through a PF-equipped camera's viewfinder or LCD screen.
Textile Industry
The PF can be used in the textile field for detection of irregularities to the fibers, particularly where the material is dyed a dark tone and visual examination is difficult.
Some other applications where the PF can be used include: environmental studies, natural resource studies, monitoring geographical and geological changes, investigating coastal erosion and identifying marsh land vegetation, archaeological exploration, surface mining and mined land disturbances, hydrological studies and channel mapping, monitoring oil spills, irrigation studies, medicine, mineralogy, philately, art history, entomology, etc.
Thus, the imaginative user should have little difficulty in recognizing PF's potential and expanding its use.
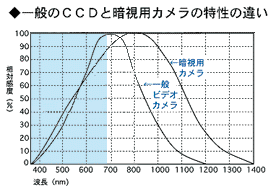
ICF and NIR sensitivity
Most normal camcorders can be also used for "seeing-through" under specific environments, for example, in bright day light abundant in NIR. This is because the ICFs inserted in normal camcorders don't block out NIR 100% and some degree of NIR can still pass through. Once again, note the graph below. The graph shows that NIR in the range from 690nm to 1200nm still reaches a normal camcorder's CCD after passing through the ICF.
All ICFs inserted in camcorders do not have the same NIR blocking efficiency. An inefficient ICF enables much more NIR to pass through and this means better see-through images. Thus, the efficiency of the ICF is inversely proportional to NIR sensitivity. Specifically, this inefficiency of ICF is the most decisive factor among many other factors having influence on NIR sensitivity of a camcorder.
In other words, you will get good see-through pictures from a camcorder which has an inefficient ICF, or (better still) with the ICF removed or displaced (as in a Nightshot camcorder).
Checking the NIR sensitivity (inefficiency of ICF)
The NIR sensitivity can be measured by simply taking pictures of your TV remote controller's transmitting lamp (facing you) with your camcorder. If you press a button on your remote controller, the transmitting lamp will emit NIR. A NIR signal can hardly be seen by a naked eye but can easily be detected by a camcorder's CCD. Thus, if the transmitting lamp appears bright on the viewfinder or LCD screen, your camcorder's NIR sensitivity is fairly good. The highest sensitivity level starts from the bright white, hazy white, yellowish glow to the lower sensitivity level of the red colorings. If the lamp appears very dim on the viewfinder, then this means that your camcorder has a very efficient ICF. Photographing an automobile's break lamp in the evening could also be another good way to measure the NIR sensitivity. If the break lamps look brighter on the viewfinder compared to a human eye, then NIR sensitivity is good.
You can also infer the NIR sensitivity level from your camcorder's minimum illumination (relative amount of light that will produce a viewable image). If your camcorder's minimum illumination is under 4-5 Lux, you may expect a pretty high NIR sensitivity.
Taking see-through pictures with a normal camcorder
If your camcorder's NIR sensitivity turned out high you can take see-through pictures with your camcorder under limited conditions. These conditions include the use of a proper PF (PF4 has to be used on a normal camcorder) and environments abundant in NIR light. As mentioned above, there is a big difference between Sony Nightshot and normal camcorders in NIR sensitivity - this is almost entirely due to the removable ICF -. However, in our example environment "A", below (abundant in NIR), there is little difference between Sony Nightshot and a normal camcorder in the efficiency and distinction of see-through images.
| Environments |
Amount of the emitted NIR |
Detailed examples |
| A |
Highest |
By a summer beach or outdoor pool, when the direct sun light is strongest. |
| B |
High |
Clouded summer's day outdoors / Sunny Spring or Autumn day outdoors. |
| C |
Fair |
Clouded Spring or Autumn day outdoors |
| D |
Lowest |
Indoor pool / Indoors where a glow lamp, mercury lamp or nitrogen lamp is installed. |
If you can set the camcorder to its highest gain level or adjust the shutter speed to a slower setting (for example, to 1/30 or 1/15 second) manually, the differences will be less apparent. - The default value of most camcorder's shutter speed is 1/60 or 1/50 second (light traveling and reaching the CCD 60 or 50 times per second) - However, a shutter speed which is too slow (for example, 1/8 or 1/4 second) will give moving objects a very blurry look. Therefore use of a slow shutter speed is recommended only for fixed objects.
In environments C and D, there is a very big difference between Sony Nightshot and normal camcorder. Though your camcorder has high NIR sensitivity, it is impossible to get acceptable see-through images in environment C or D without adjusting the shutter speed to much slower setting (for example, 1/8 or 1/4 second) manually. Therefore, in principle, it is impossible to take see-through pictures of moving objects in these environments. If you want to get acceptable see-through images of moving objects in environments C and D as well, you need to modify your camcorder to be more like a "Nightshot" camcorder.
Modifying your normal camcorder for the perfect NIR sensitive camcorder like Sony Nightshot
Modified camcorders will allow you to get the best see-through images under any NIR environment just like a Sony Nightshot. The purpose of modifying is quite clear and simple. You just need to remove the ICF installed in-between optical lens and the CCD. You can easily distinguish this ICF from any optical lens. The reason is that most optical lenses are crystal-clear while the ICF has either a cyan (light blue) or deep blue tint to it.
 In rare cases, some ICFs have purple tint on them. Yet, in any cases, if you find any color tinted glass while you are disassembling your camcorder, you can just assume it to be the ICF you were looking for. The shape of ICF can vary. It can take the form of a circle, square, hexagonal or an octagon. After removing the ICF from your camcorder, when you install the PF1 or PF2 (PF4 is not suitable for modified camcorders) onto your object lens, you can soon take see-through pictures under any NIR environment. The images will be clear in distinctive black and white.
However, the following facts have to be regarded before modifying. Camcorders without an ICF can take see-through pictures and "see" at night time (with an additional IR Illuminator like Sony HVL-IRC) but give strangely coloured images under normal conditions. This is because when there isn't ICF, too much NIR reaches the CCD. It's the reason there is an ICF installed in the first place. It is recommended you to put the ICF back in the camcorder after taking see-through pictures. These procedures may seem too much trouble, which is why we also sell our own "ICF1". The ICF1 is an external IR Cut Filter that promises the same kinds of images as before the modification. Its compensating effect is almost exactly the same as the IR Cut Filter already installed in your camcorder.
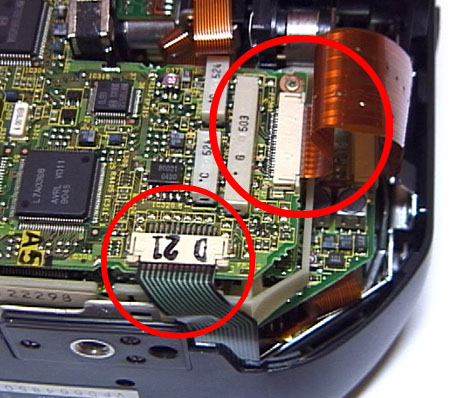
Modifying Procedure - Click here to see the original large formatted images together.
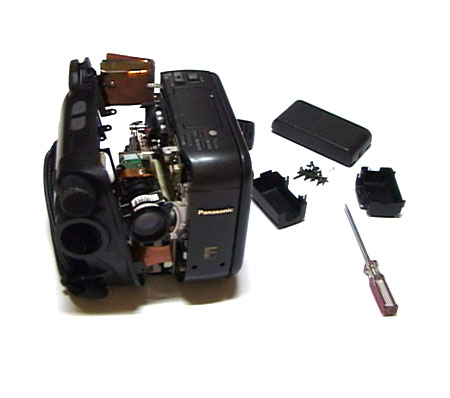
Below is Panasonic camcorder model, NV-S2.
Unscrew the main body parts of the camcorder. Note that there are many plastic hooks as well as screws in most camcorder models. So don't force anything!
 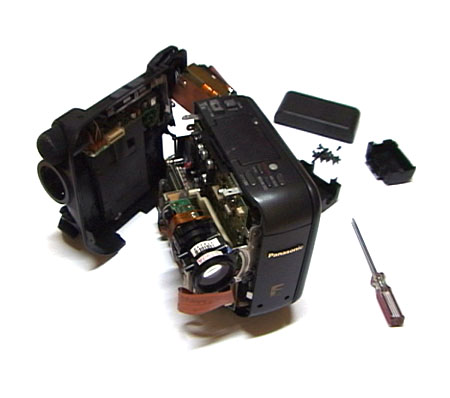
Here you can see the optical lens/CCD assembly.
To separate the optical lens/CCD assembly, disconnect all ribbon cables or wires attached.
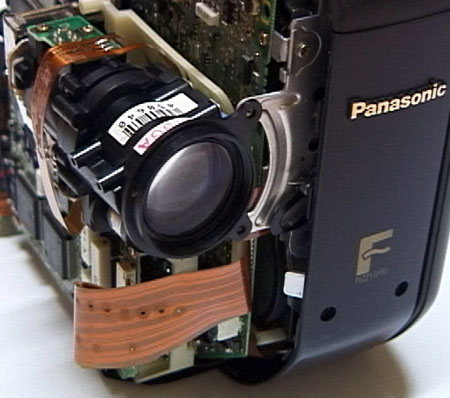
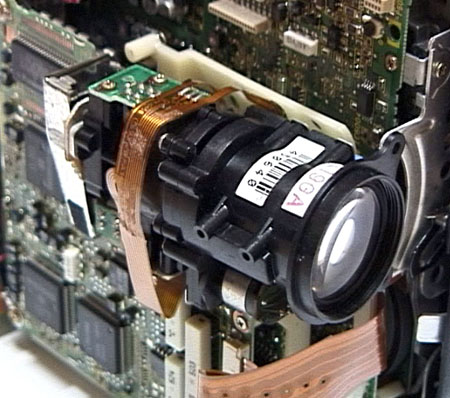
Separate the CCD assembly from the optical lens assembly.
The ICF is always located in front of the CCD. You can see the ICF, with its light blue tint, attached directly to the CCD chip, below. Remove the ICF. In some cases, the ICF isn't attached to the CCD chip directly but may be somewhere inside the CCD assembly at a short distance from the CCD chip.
Reassemble the parts back together and power it up. You should see normal operation. If you can't see an image through the viewfinder, you most likely didn't quite align a ribbon cable or wire properly. Once you have everything back to normal, confirm the colors through the viewfinder or LCD screen. They should be somewhat reddish. If you made it to this point, now you have an equivalent to a Sony Nightshot camcorder. After attaching the PF1 or PF2 onto the object lens you can take see-through pictures. If you want to get normalized images like the ones before the modification, simply attach a suitable size of our ICF1 onto the object lens instead of the PF filter.
A Few Tips before Modifying
- In fact, it isn't that difficult to locate the ICF. The difficult aspect of modifying your camcorder is reassembling the screws and parts back in order. That's why we recommend you to record the orders and locations of where to put the screws and parts back as you disassemble in the first place. As you might know already, reassembling the parts is a more difficult job compared to disassembling. If you have another camcorder, it may be useful to video the procedure.
- The CCD is an integrated circuit with a window on the top. Bear in mind that it is static sensitive and can be destroyed easily. So make sure you don't touch anything but the edges of the CCD. It's also a good idea to "ground" yourself regularly by touching a radiator pipe or similar, to discharge yourself of any static build-up.
- Remember to avoid smearing your fingerprints or collecting any dust on the optical lens during the modification. The fingerprints smeared on the optical lens during the modifying procedure may later appear quite clearly on the viewfinder or the LCD screen.
-
You have to be cautious in handling all the parts while modifying. In Japan, any damage done to the internal parts does not qualify under the warranty, but it's not the same in all countries. If you are at all unsure of this procedure, or not feeling brave enough, you should be able to take the camera to a suitable repair shop and ask the technician to remove the ICF for you. |